
How to Claim Your Google+ Authorship: And You Should!
Posted on 30. Apr, 2014 by Faye Bond in Blog, Bond Global Enterprises, Google +1, Marketing, Online Business, Traffic

How to Claim Your Google+ Authorship: And You Should!
Since the launch of Google+ in June 2011 Google there are over 540 million active Google+ users. That is the number of people with Google accounts that interact with Google+ in some way or another. This could be clicking the +1 button or commenting on a blog or website that has Google+ comments embedded.
That’s right 540 million users. Now that’s something to think about.
Now Google has introduced a new feature, you may have heard of it already… Google Authorship.
And here is the exciting part for you as an online business owner.
This is where you can claim your content as your own.
This is where you tell Google that you wrote and published the content that is on your website or your blog or as a guest blogger on another website.
This is great because when you claim your content your picture and your bio goes with it.
Google searchers will see your profile image, they will see your bio and are more likely, they say 150 times more, to click on your link and be taken to your website.
Is this cool or what? I think so!
Are you ready to get your content under Google’s nose? Are you ready to become visible and be known as an expert in your field. Well now you can with Google+ Authorship.
Here’s how you can link all your content and tell Google…’Hey it’s me, I wrote this, and I wrote this one and this one too.’ Once you are on their radar you will start to become someone Google trusts.
1. Google Account
First you need a Google account. You already use Gmail or YouTube or use any other Google products such as Google Analytics. If not setting up a Google account is simply an email address and password combination.
If you don’t have a Google account yet, you can sign up on this page.
If you created a new Gmail address (or logged in with one) there’s no need to separately create your Google+ profile – Google will do that for you automatically – you now need to do some editing.
Rich Snippets is where Google takes your photo and name and displays these on the search results. For Google+ Authorship to work you need to have a "good, recognizable headshot" of yourself and your name. Google will only enable this feature if your photo is a clear and recognizable photo of you. Not a picture of your cat.
Continue setting up your profile by adding a bio and any other information that you want to add.
2. Configure Authorship and Claim Your Content
There are two separate steps:
Step 1: Link your Google+ profile to your blog.
Step 2: Link your blog content back to your Google+ profile.
You can establish authorship in a number of ways but here we are looking at one of the most common scenarios where you are running a self-hosted WordPress blog. The easiest way is to use a WordPress plugin. But before we do that we need to tell Google about your blog.
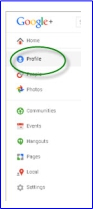
To tell Google that you are the author of your blog content login to your Google account and head over to your Google+ home page, click the +YourName link at the top-right corner.
Then select "Profile£ from the drop-down menu on the left-hand side.
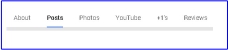
And then select "About" from the horizontal menu at the top of the page.
On your About Page you’ll see a number of different panels. Fill these in with your information as this will bring your profile to life. For now, we’re only interested in one – Links
Scroll down and click on Edit in the Links panel.
Find the "Contributor to" section and click "Add custom Link".
You should see a new panel some some fields to fill-in. Complete these.
- Label: Enter a human friendly name of your blog
- Full URL of your site: http://www.bondglobalenterprises.com
- Select "current contributor" from the drop-down menu
- Set the visibility to "public".
Do the same with the links to your websites and blogs.
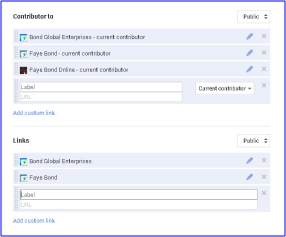
Finally click "Save" at the bottom of the panel. Step 1 is complete
Before we enable Authorship on your blog there is something you’ll need from your Google+ account and that’s your unique Google+ URL. Every Google+ user has a unique 21-digit ID.
You can find your own Google+ ID by going to your Profile then into your About page and editing the panel. Here you can claim your Google+ Custom URL. For instance mine is https://plus.google.com+FayeBond. The +Username label is a direct replacement for the 21-digit ID. Create your own customer URL and save it to your computer.
Step 2 is enabling Authorship on your Blog. This is very easily achieved by installing the Yoast WordPress SEO Plugin. This plugin is very popular and free and helps you optimize your blog from an SEO point of view as well as allows you to configure Google Authorship for your blog.
There are two separate tasks – Installing the plugin and adding your Google+ URL to your WordPress Author Profile.
a) Install the Plugin
If not already installed, go to Plugins – Add New and search for WordPress SEO in the ‘Search Plugins’ box. It will most likely be at the top of the list. Click on Install Now.
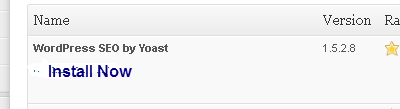
Once installed click on "Activate Plugin" and you are ready to go.
b) Add Your Google+ URL to Your WordPress Author Profile
Now that you have the plugin installed you need to tell WordPress where to find you on Googe+. This will give the plugin the information it needs to automatically insert Authorship markup into your blog posts and pages. To do this first select "All Users" on the left of your WordPress Dashboard. Then find your profile in the list and click "Edit"
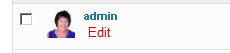
In the Contact Info section, find the field labelled Google+. This is where you will paste the Google+URL you copied earlier. Click "Update User".
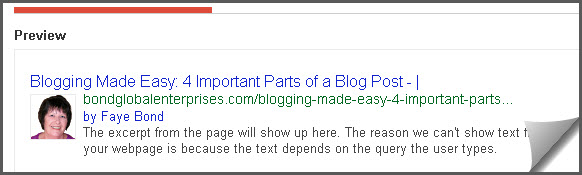
That’s it. Now let’s check that it’s all working and that’s as easy as using Google’s Structured Data Testing Tool
This is a simple app that attempts to detect any structured data markup such as Authorship and displays what it finds. All you need to do is paste in the full URL of a post from your blog, click "Preview". And hey presto it’s all in green – so it works.
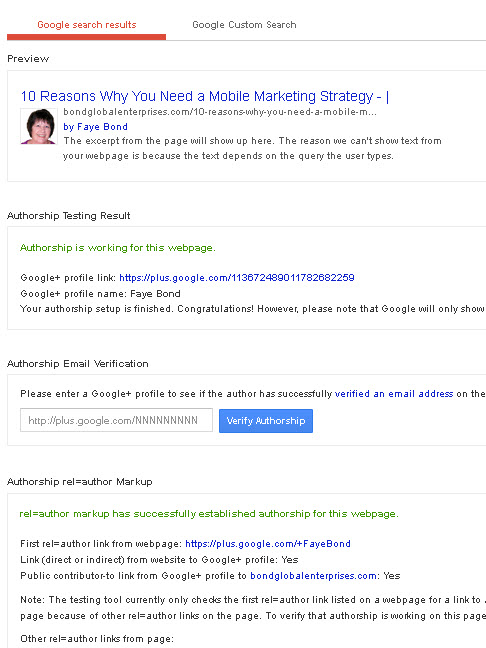
So now you’ve configured Authorship for your blog, Google is finally able to notice you as a writer and give you credit for the content you create.
Great start. Happy authorship.
Did you manage to activate your Google+ Authorship?

About Faye Bond
Connect with me
Testimonials

Faye...The way you listed all the details and
walked us through the process step by step is
invaluable. The information you have provided
will save us time, and make us instant experts!
Thank you so much, Faye. This is great
information - very valuable and perfect timing!
I really appreciate you bringing us all this
great detail.
Cindy Heil, Aurora, Colorado, USA
Faye... your ability to take information and
simplify it in a step by step formula, makes
it not only easy to follow, but now easy to
implement! Your training is going to help
everyone to go from stuck to success because
they now have the training and information
they need to take action and cross the finish
line. What an excellent presentation!
Debra Thompson Roedl, Phoenix, Arizona, USA


 Twitter
 Facebook
 Youtube
 LinkedIn